I used to build locally and FTP to a VPS. That manual loop wastes time, so I set up automated deployment.
Tech Stack
- Code hosted on GitHub
- Frontend: Angular
- Backend: Express
- VPS: Tencent Cloud server (CentOS 7.x)
I used Travis for CI/CD.
Deployment flow
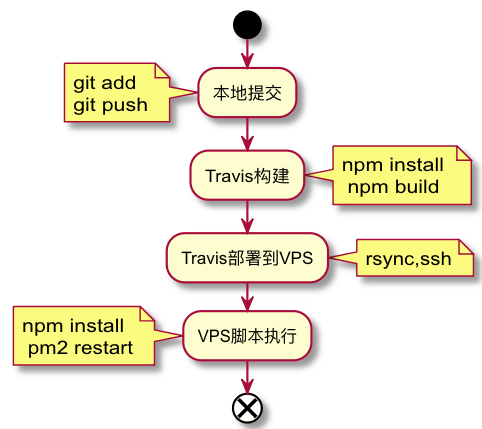
After code is committed to GitHub, Travis builds and packages it, then executes a sync script to transfer files to the VPS, and finally runs a service restart script.
Key points
The entire configuration process isn’t difficult, but there are a few pitfalls to watch out for.
File transfer
Use rsync to sync artifacts to the server.
For detailed command documentation, click here
SSH Passwordless Login
Travis needs to transfer packaged files to the VPS, which requires username/password for remote login. Plain text passwords have security issues, but Travis provides encryption. Here’s how to set it up:
SSH login to the VPS (commands 2-3 are executed on the target VPS)
Create public/private key pair for Travis
$ ssh-keygen -f travisEncrypt the private key and create instructions in YML
$ gem install travis
$ travis login
$ ssh-keygen -t rsa -b 4096 -C 'qianghe421@163.com' -f ./deploy_rsa
$ travis encrypt-file deploy_rsa --add
$ ssh-copy-id -i deploy_rsa.pub root@1991421.cn
After executing the commands, the YML file will create the script for step 4 below
*Note*
My VPS runs CentOS 7, and I got errors when executing gem, so I had to troubleshoot
#### Installing RubyGems

```bash
 yum install rubygems
 yum install ruby-devel
 yum install make automake gcc gcc-c++ kernel-devel
```

/usr/bin/ssh-copy-id: ERROR: Host key verification failed.


```bash
$ ssh-copy-id  -o StrictHostKeyChecking=no -o UserKnownHostsFile=/dev/null  -i /var/www/blog/alanhe421.github.io/deploy_rsa.pub root@1991421.cn
```
Modify the script
- openssl aes-256-cbc -K $encrypted_b86c2ca78306_key -iv $encrypted_b86c2ca78306_iv -in .travis/travis.enc -out ~/.ssh/id_rsa -dThe automatically generated script needs a small modification
Note
- When the script is created, it may wrap automatically. Make sure it’s on a single line; otherwise Travis will fail with
Could not parse .travis.yml
- Add ssh_known_hosts
Without this, you’ll get the following connection prompt

Complete Script Configuration
language: node_js
node_js: 8
addons:
  ssh_known_hosts:
    - 132.232.104.101
before_install:
  - openssl aes-256-cbc -K $encrypted_b86c2ca78306_key -iv $encrypted_b86c2ca78306_iv -in .travis/travis.enc -out ~/.ssh/id_rsa -d
  - chmod 600 ~/.ssh/id_rsa
install:
  - cd backend
  - npm install
  - cd ..
  - cd frontend
  - npm install
  - cd ..
script:
  - cd frontend
  - npm run build
  - cd ..
  - cd backend
  - npm run build
  - cd ..
after_script:
  - cd ./frontend/dist/blog-admin
  - rsync -az -vv --delete -e 'ssh -p 22' ./** root@132.232.104.101:/var/www/blog-admin/dist
  - cd ../../..
  - cd ./backend/dist
  - rsync -az -vv --delete -e 'ssh -p 22' ./** root@132.232.104.101:/var/www/blog-admin
  - cd ../..
  - rsync -az -vv --delete -e 'ssh -p 22' backend/package*.json root@132.232.104.101:/var/www/blog-admin
  - ssh -p 22 root@132.232.104.101 "cd /var/www/blog-admin;npm install --production;pm2 restart blog-admin"
branches:
  only:
    - master
notifications:
  email:
    - i@alanhe.me
Final Thoughts
After implementing CI automatic deployment, future changes to the blog platform just need to be committed to GitHub - everything else is automated. Perfect!